
In our SMPP Center’s SMPP Software white label program, resellers can provide social media links which will be displayed in the site’s footer and in email alerts. This document explains how to configure these settings through the provided form.
Form Fields Overview
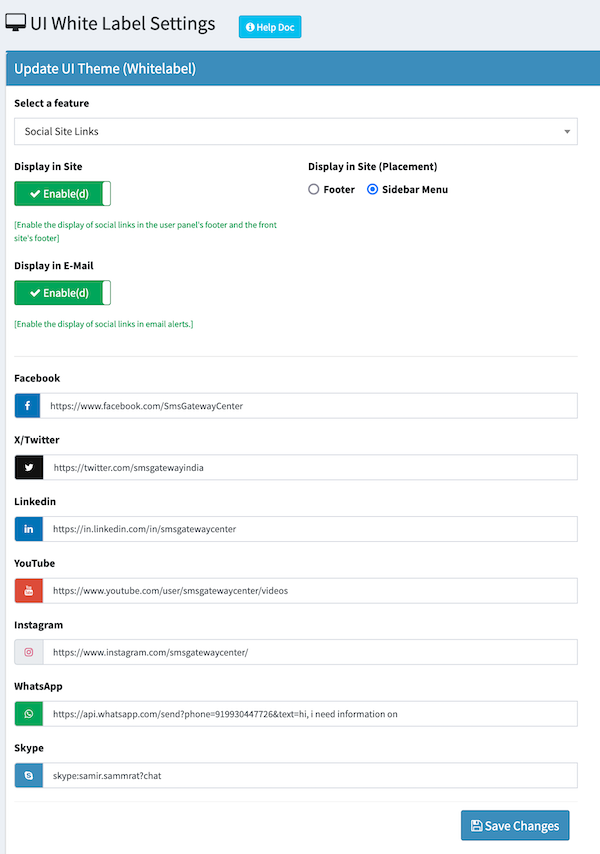
1. Select a Feature
- Field:
themesetting - Type: Dropdown
- Options:
- Social Links (default selection)
This dropdown allows you to select the feature you want to configure. In this case, “Social Site Links” is the selected option.
2. Display in Footer
- Field:
showFooter - Type: Checkbox
- Description: Enable or disable the display of social links in the user panel’s footer and the front site’s footer.
- Toggle Options:
- Enable(d)
- Disable(d)
This checkbox determines whether the social links will be displayed in the footer of your site.
3. Display in E-Mail
- Field:
showEmail - Type: Checkbox
- Description: Enable or disable the display of social links in email alerts.
- Toggle Options:
- Enable(d)
- Disable(d)
This checkbox controls whether the social links will be included in email alerts sent to users.
4. Social Media Links
Facebook Link:
- Type: Text
- Placeholder:
https://www.facebook.com/yourpagename
X/Twitter Link:
- Type: Text
- Placeholder:
https://x.com/yourusername
LinkedIn Link:
- Type: Text
- Placeholder:
https://in.linkedin.com/in/yourpagename
YouTube Link:
- Type: Text
- Placeholder:
https://www.youtube.com/user/yourusername/videos
Instagram Link:
- Type: Text
- Placeholder:
https://www.instagram.com/yourusername/
Skype Link:
- Type: Text
- Placeholder:
skype:yourusername?chat
Each social media platform has a corresponding input field where you can enter the URL to your page or profile. These fields are optional, and you can fill in only the ones you want to display.
5. Save Changes
- Button:
Save Changes - Type: Submit
- Description: Click this button to save your changes. While saving, a loading indicator will be displayed.
Once all the desired fields are filled out, click the “Save Changes” button to apply your configurations. A progress indicator will show that the form is being submitted.
Instructions for Use
- Select Feature: Ensure that “Social Links” is selected in the “Select a feature” dropdown.
- Enable Footer Display: Check the “Display in Footer” toggle to enable social links in the site’s footer.
- Enable Email Display: Check the “Display in E-Mail” toggle to include social links in email alerts.
- Enter Social Media Links: Fill in the URLs for the social media platforms you want to display.
- Example: For Facebook, enter the URL to your Facebook page in the “Facebook” input field.
- Save Changes: Click the “Save Changes” button to apply your settings. Wait for the confirmation that changes have been saved.
By following these steps, you can effectively manage and display your social media links in the designated areas of white label site and email alerts.