This guide explains how to enable SMPP (Short Message Peer-to-Peer) connectivity for users on the SMPPCenter platform. SMPP connectivity allows you to send and receive SMS messages efficiently using the SMPP protocol, offering advanced features for bulk messaging and integration. Follow the steps below to configure SMPP settings for your users.
Step-by-Step Instructions
1. Access the User Configuration Panel
Navigate to the specific user’s settings page where SMPP configurations are managed.
2. Enable SMPP for the User
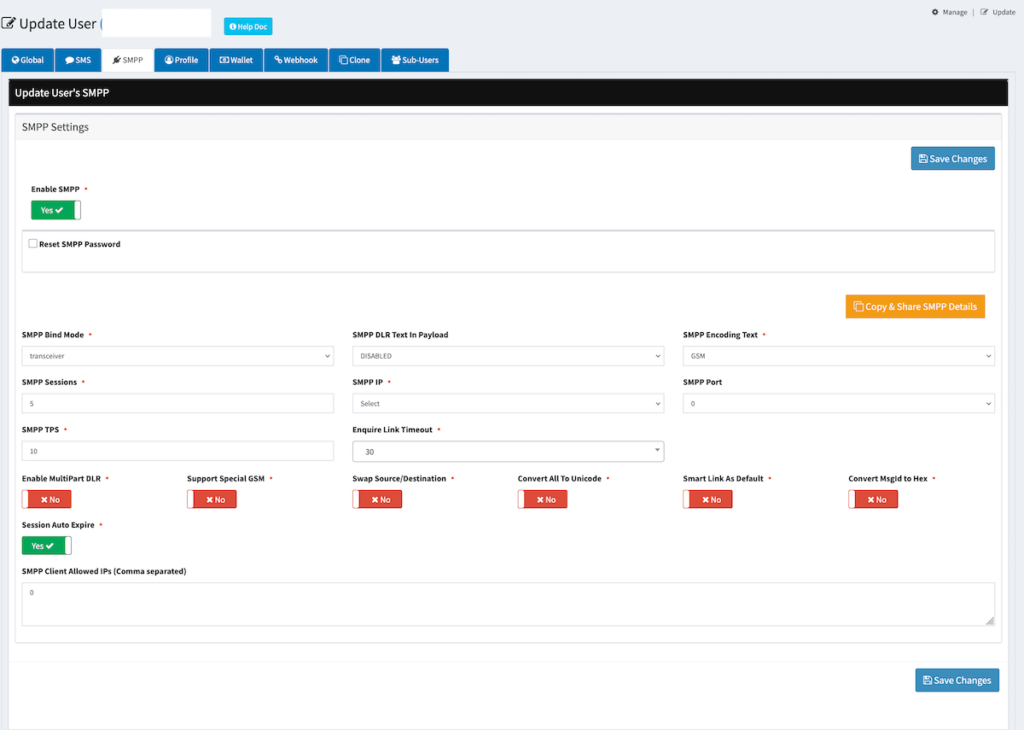
- Locate the “Enable SMPP” option.
- Toggle the switch to “Yes”.
💡 Enabling SMPP will display additional SMPP-specific configuration settings.
3. Optional: Reset or Set SMPP Password (Edit)
- Check the “Reset SMPP Password” box to allow entering a new password.
- A password field will appear.
- Enter a new password (max 8 characters), or
- Click “Generate Password” to auto-create one.
- Click “Show” to reveal the typed/generated password.
4. Configure SMPP Connection Parameters
| Setting | Description |
|---|---|
| SMPP Bind Mode | Choose from transceiver, transmitter, or receiver. |
| SMPP DLR Text In Payload | Set to ENABLED or DISABLED. |
| SMPP Encoding Text | Select encoding: GSM or ASCII. |
| SMPP Sessions | Define the number of allowed sessions (numeric). |
| SMPP IP | Select the SMPP server IP (e.g., unify.smsgateway.center). |
| SMPP Port | Choose the port (ensure this matches backend/server settings). |
| SMPP TPS | Set Transactions Per Second limit. |
| Enquire Link Timeout | Choose timeout interval (e.g., 30, 60, 90, etc. seconds). Recommended is 30. |
5. Additional Toggle Settings
Enable or disable the following advanced features based on user requirements:
| Feature | Description |
|---|---|
| MultiPart DLR | Toggle to support delivery reports for multipart messages. |
| Support Special GSM Characters | Enable to allow special GSM character encoding. (Only if your vendor supports it) |
| Swap Source/Destination | Switch to swap source and destination in SMPP requests. (optional) |
| Convert All to Unicode | Force all messages to be sent in Unicode format. (optional) |
| Smart Link as Default | Enable if smart tracking links are used by default. (optional) |
| Convert MsgId to Hex | Convert Message ID to hexadecimal format. (optional) |
| Session Auto Expire | Automatically expire inactive SMPP sessions. (optional) |
6. Save Your Settings
Click “Save Changes” to apply all configurations.
7. Copy and Share SMPP Credentials
- Click the “Copy & Share SMPP Details” button.
- This copies the full SMPP configuration (username, password, server, port, etc.) to clipboard for easy sharing with the user.
Troubleshooting Tips
- SMPP Not Connecting: Ensure the SMPP IP, port, and password are correct. Verify that the client’s IP is whitelisted in the “SMPP Client Allowed IPs” field.
- Messages Not Sending: Check the TPS limit and SMPP Bind Mode to ensure they match your campaign requirements.
- Special Characters Not Displaying: Enable the “Support Special GSM” or “Convert All To Unicode” options as needed.
Notes
- Changes take effect immediately upon saving.
- Leave the password field blank if no update is needed.
- Ensure users are informed of the TPS and session limits.
- The SMPP password must be exactly 8 characters long — minimum and maximum length is 8 characters.
For further assistance or to report issues with SMPP setup, contact us.