Overview
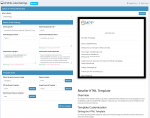
This tutorial will guide you through configuring the E-Mail settings for resellers in the white label program using the SMPP Center’s SMPP software. This includes customizing the e-mail logo, header, and footer details, as well as selecting various e-mail templates.

Accessing E-Mail Settings
- Login to your reseller account on the SMPP Center platform.
- Navigate to the E-Mail Settings section.
- Select “E-Mail Settings” from the dropdown menu under “Select a feature”.
Configuring E-Mail Settings
Default E-Mail Settings
- E-Mail Logo URL:
- Label: E-Mail Logo URL
- Description: Specify the URL of an image to be used as the email logo.
- Example:
https://cdn.pixabay.com/photo/2017/03/16/21/18/logo-2150297_1280.png - Action: Enter the URL in the “E-Mail Logo URL” field.
- Header Background Color:
- Label: Header Background Color
- Description: Choose a background color for the e-mail header.
- Action: Enter a HEX color code in the “Header Background Color” field.
- Example:
#9a167f
- Footer Background Color:
- Label: Footer Background Color
- Description: Choose a background color for the e-mail footer.
- Action: Enter a HEX color code in the “Footer Background Color” field.
- Example:
#2a7e12
- E-Mail Footer Address & Phone:
- Label: E-Mail Footer Address & Phone
- Description: Add your company’s address and phone number to the email footer.
- Allowed Tags:
<a>, <b>, <strong>, <h3>, <p>, <br> - Example:
Your address, region, city, country - Action: Enter the address and phone number in the “E-Mail Footer Address & Phone” field.
- E-Mail Footer Copyright:
- Label: E-Mail Footer Copyright
- Description: Add a copyright notice to the email footer.
- Allowed Tags:
<a>, <b>, <strong>, <h3>, <p>, <br> - Variables:
{CURRENTYEAR}, {RESELLERCONAME} - Example: Copyright © {RESELLERCONAME}, 2012 – {CURRENTYEAR}. All Rights Reserved
- Action: Enter the copyright notice in the “E-Mail Footer Copyright” field.
- E-Mail Footer Unsubscribe Notice:
- Label: E-Mail Footer Unsubscribe Notice
- Description: Add an unsubscribe notice to the email footer.
- Allowed Tags:
<a>, <b>, <strong>, <h3>, <p>, <br> - Variables:
{RESELLERCONAME}, {DOMAIN} - Example: You are receiving this email as part of your {RESELLERCONAME} membership. You may unsubscribe to email, however our entire site functionality is centered on email. As such, email is a mandatory requirement for membership. If you wish to unsubscribe and cancel your membership. <a href=”{RESELLERDOMAINLOGINLINK}/user/profile/”>Please unsubscribe here</a>.
- Action: Enter the unsubscribe notice in the “E-Mail Footer Unsubscribe Notice” field.
Template Styles
You can select a different pre-defined available templates.
- Default Template (Common Usage):
- Label: Default Template (Common Usage)
- Description: Choose the default email template.
- Action: Select a template from the dropdown menu.
- Options:
Default, Template 2, Template 3 - Example:
Template 3 - Preview: You can view the “Live Preview” on the right column.
- Signup Template:
- Label: Signup Template
- Description: Choose the email template for sign-up emails.
- Action: Select a template from the dropdown menu.
- Options:
Default, Signup, Signup 2 - Example:
Default - Preview: Click on the “Preview” button to see the selected template.
- OTP Verification Template:
- Label: OTP Verification Template
- Description: Choose the email template for OTP verification emails.
- Action: Select a template from the dropdown menu.
- Options:
Default, OTP, OTP 2 - Example:
Default - Preview: Click on the “Preview” button to see the selected template.
- Forgot Password Template:
- Label: Forgot Password Template
- Description: Choose the email template for forgot password emails.
- Action: Select a template from the dropdown menu.
- Options:
Default, Forgot, Forgot 2 - Example:
Forgot 2 - Preview: Click on the “Preview” button to see the selected template.
- Reset Password Success Template:
- Label: Reset Password Success Template
- Description: Choose the email template for reset password success emails.
- Action: Select a template from the dropdown menu.
- Options:
Default, Reset, Reset 2 - Example:
Reset - Preview: Click on the “Preview” button to see the selected template.
Saving Changes
- Save Changes:
- After configuring all the settings, click on the “Save Changes” button at the bottom of the page.
Important Notes
- Test Your Template: Before sending out emails, ensure your template displays correctly across various email clients.
- Keep It Simple: A simple and responsive design ensures a better user experience.
By following these steps, you can effectively configure your e-mail settings to match your brand and ensure consistent communication with your customers.
You can also request us to include your own E-Maill template.